Vibe Coding for Scientists
AI-Assisted Development for Scientific Workflows
Scope Clarification: This guide teaches vibe coding—using AI tools (Claude, Cursor AI) to build applications. It is not about building LLM-focused applications or agentic AI systems. That is a separate, more advanced topic requiring different approaches and infrastructure. Note: This guide reflects my personal approach to vibe coding on a MacBook Pro M4. The principles apply universally, but you're welcome to use different tools, platforms, or technology stacks that suit your workflow.
Note: Numbered tabs (1-5) form the core workflow. Unnumbered tabs are optional reference materials.
Vibe coding is an AI-assisted development approach where you orchestrate two specialized tools: Claude for strategic thinking and architecture, and Cursor AI for code implementation. This isn't about writing less code—it's about having AI partners handle implementation details while you focus on scientific logic and workflow design.
⭐ Four Golden Rules for Working with AI
Rule 1: Be Methodical and Rigorous
When using Claude for understanding, design, and brainstorming, be methodical and rigorous. Try not to move too fast and get caught up in the "Tik tok" mentality that these apps offer. Take time to think through your approach, validate assumptions, and ensure you truly understand the problem before rushing to implementation.
Rule 2: Ask for Help When Confused
If something isn't working as expected or is confusing you, ask Cursor AI and/or Claude for help. These tools excel at explaining technical concepts, debugging errors, and clarifying confusing behavior. Don't waste time stuck—leverage the AI's ability to provide instant explanations and guidance.
Rule 3: Stay in Control & Challenge Responses
Claude, Cursor AI, and other AI tools can make mistakes and can be biased. You need to stay in control of the discussion and sometimes challenge their responses. They're not infallible authorities—they're collaborative partners. If something doesn't seem right, push back, ask for alternatives, or request they reconsider. They will work with you.
Rule 4: Include Test Inputs & Expected Outputs
Always include 2+ test inputs with their expected outputs in your prompts to both Claude and Cursor AI. This provides strong guidance for app development and prevents the AI from hardcoding solutions to a single example. Multiple test cases ensure the generated code is generalizable and handles diverse scenarios correctly.
The Workflow Dynamics
A Lighthearted Caution About Foundations
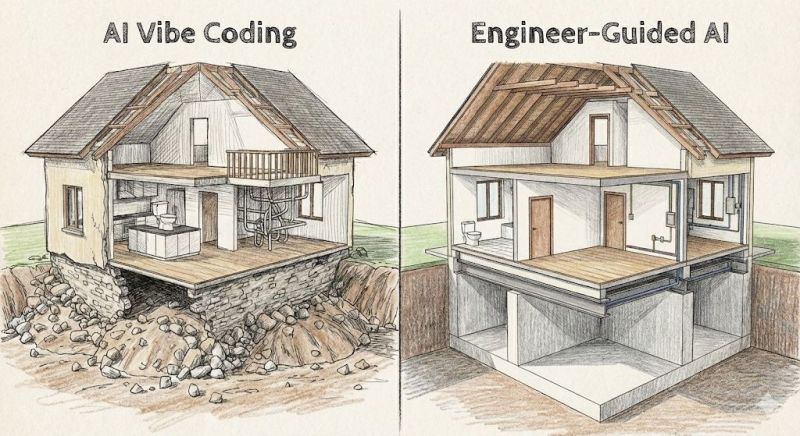
The honest metaphor: Vibe coding builds functional applications quickly, but they're constructed on rocky foundations—just like the house on the left. Everything works, the rooms are livable, but the structural integrity beneath isn't engineered for permanence.
What This Means in Practice:
- Your code may have hidden edge cases you haven't discovered
- Error handling exists where AI thought to add it, not systematically
- Dependencies might not be pinned to specific versions
- Test coverage is limited to what you manually verified
- Scaling to production would require significant refactoring
The house on the right? That's engineer-guided AI development—proper foundation, load-bearing walls, engineered for longevity. It takes longer to build, requires more expertise, but it's designed to last and scale.
For scientists: If you're building research tools for personal use or small teams, the rocky foundation is often perfectly acceptable. The house stands, it serves its purpose, and you can always rebuild with better foundations later if needed. Just be aware of what you're building on, and don't be surprised when production deployment requires more engineering rigor than vibe coding provides.
- Scientific problem and workflow requirements
- Input data formats and expected outputs
- Any constraints (performance, dependencies, platform)
- Recommended architecture and design patterns
- Component breakdown with responsibilities
- Technology stack suggestions
- Potential challenges and alternatives
- Complete directory structure
- pyproject.toml with dependencies
- Per-file specifications with responsibilities
- Data flow and integration points
- Create project directory structure manually
- Import Claude's specification files into Cursor
- Cursor creates .venv and installs packages automatically as you code
- Generate one component at a time
- Reference specifications explicitly
- Request inline comments for complex logic
- Install dependencies:
uv sync - Run main application or test scripts
- Document all error messages
- Copy error messages directly into Cursor chat
- Switch to auto mode for simple syntax fixes
- Use Sonnet 4.5 for logic errors or complex bugs
- Repeated failures on the same error
- Architectural mismatches or conflicts
- Unclear implementation approach
- Performance or scalability concerns
- Educational understanding of code behavior
- "Does this implementation approach make sense?"
- "Why is this pattern causing issues?"
- "What's actually happening in this code?"
- "Is there a better architectural approach?"
- Explaining conceptual problems
- Suggesting alternative approaches
- Educational explanations of code behavior
- Strategic thinking about architecture
- Tests pass consistently
- Code meets original specifications
- No critical issues remain
- You understand how it works
Claude Strengths
- Conceptual thinking and design
- Explaining complex patterns
- Evaluating multiple approaches
- Educational explanations
- Strategic architecture decisions
Limitations
- Token limits per chat
- Cannot directly execute code
- Requires manual file export
- Can hallucinate implementation details
Cursor AI Strengths
- Direct code generation and editing
- Integrated testing environment
- Model switching for efficiency
- Real-time error detection
- File system integration
Limitations
- Weaker at conceptual discussions
- Token usage can be expensive
- Less effective for architecture decisions
- May not question approach validity
Vibe Coding: Your Entry Point to AI Engineering
Vibe coding is deliberate scaffolding. It's designed to get scientists building functional applications quickly, but it's also the foundation for more sophisticated AI engineering practices. Think of it as training wheels that teach you the terrain before you need to navigate it independently.
AI Engineering is the discipline of building production-grade systems that leverage large language models and other AI capabilities. Unlike vibe coding, which focuses on rapid prototyping with heavy AI assistance, AI engineering emphasizes:
Production Systems
Reliability, monitoring, error handling, logging, deployment pipelines
Cost Management
Token optimization, caching strategies, model selection, budget tracking
Evaluation & Testing
Systematic prompt testing, output validation, regression testing, performance benchmarks
Architecture Patterns
RAG implementations, agent frameworks, multi-model orchestration, state management
| Aspect | Vibe Coding | AI Engineering |
|---|---|---|
| Primary Goal | Get working prototype quickly | Build production-ready systems |
| AI Role | Generate most of the code | Assist with specific components |
| Code Understanding | High-level comprehension acceptable | Deep understanding required |
| Testing Approach | Manual testing, "does it work?" | Automated tests, evaluation frameworks |
| Error Handling | Basic try/catch, ask AI to fix | Comprehensive error strategies, logging |
| Prompt Management | Ad-hoc, conversational | Versioned, tested, optimized |
| Cost Awareness | Subscription-based, limited tracking | Per-token budgets, optimization strategies |
| Debugging | Copy errors to AI, iterate | Systematic debugging, root cause analysis |
| Documentation | AI-generated, often outdated | Actively maintained, up-to-date |
| Deployment | Local or simple hosting | CI/CD pipelines, monitoring |
| Time to First Version | Hours to days | Days to weeks |
| Scalability | Single user, prototype scale | Multi-user, production scale |
Vibe coding isn't wasted time. These skills and knowledge directly transfer to AI engineering:
✓ Understanding AI Capabilities & Limits
You've learned what LLMs can and cannot do reliably through direct experience
✓ Prompt Engineering Fundamentals
Clear communication with LLMs, context management, specification clarity
✓ Application Architecture Patterns
FastAPI structures, data flow, API design from generated applications
✓ Debugging Intuition
Pattern recognition for common errors, understanding stack traces
✓ Python Ecosystem Familiarity
Package management, virtual environments, common libraries
✓ Scientific Domain Knowledge
Your research problem understanding—this doesn't change
Honest assessment: Most scientists don't need to become AI engineers. Vibe coding is sufficient for research tools, internal applications, and proof-of-concept work. Consider the transition when:
Multiple Users
Your tool needs to serve colleagues or external users reliably
High Frequency Use
Running hundreds or thousands of times per day with cost implications
Critical Research Path
Failures would significantly impact research outcomes or timelines
Publication/Reproducibility
Need to publish methods or share with the scientific community
Complex LLM Workflows
Multi-step agent systems, RAG implementations, or custom fine-tuning
Career Direction
Moving toward computational roles or building AI-powered products
The Path Forward
Start with vibe coding. Build working tools for your research. Understand what's possible and what's difficult. Then, if your needs grow beyond prototypes, you'll have the foundation to either learn AI engineering yourself or effectively collaborate with engineers who can take your vision to production.
Model Selection Strategy: Use Sonnet 4.5 when generating the initial codebase—it produces higher quality results. Then switch to auto mode for fixing, refining, testing, and deploying. Sonnet 4.5 uses tokens faster, so this approach balances quality with token efficiency.
🚀 Advanced Alternative: Claude Code 2.0
For advanced readers interested in exploring coding agents, Sankalp shares practical experience and strategies for getting better results with Claude Code 2.0 and similar AI coding tools.
Consider Claude Code instead of Cursor AI for:
- Terminal automation - Unix composability (pipes, scripts, CI/CD), autonomous operation modes - instead of Cursor AI's interactive development environment
- MCP integration - Native connections to GitHub, databases, lab systems, Google Drive, custom APIs
"My experience with Claude Code 2.0 and how to get better at using coding agents—practical insights into working effectively with AI-powered development tools."
Sankalp • January 2026
This guide uses uv: An extremely fast Python package and environment manager. It's faster than pip/venv and represents current best practices. Learn more about uv →
What is a Virtual Environment?
A virtual environment is an isolated Python workspace for your project. It creates a separate directory containing its own Python interpreter and installed packages, completely independent from your system's global Python installation.
Why you need it: Different projects often require different versions of the same package. Without isolation, Project A might need NumPy 1.24 while Project B needs NumPy 2.0—installing one breaks the other. Virtual environments solve this by giving each project its own package space. They also make your projects reproducible: someone else can recreate your exact environment from a requirements file, ensuring the code works identically on their machine.
curl -LsSf https://astral.sh/uv/install.sh | shuv --versionuv add without manual intervention.
💬 Claude Is Your Setup Assistant!
Stuck on a setup step? Encountering errors? Not sure what a command does? Ask Claude for help!
Example Questions to Ask Claude:
- "I'm getting 'command not found' when running
uv venv. What does this mean?" - "Does Cursor create the virtual environment automatically or do I need to run
uv venv?" - "How does Cursor know which packages to install automatically?"
- "Claude is installed but Cursor can't find it. How do I verify the path?"
- "I'm on Linux—do I need to change any of these commands?"
- "When would I need to manually run
uv syncinstead of letting Cursor handle it?"
Claude can provide platform-specific guidance, debug errors, explain technical terms, and walk you through setup challenges step-by-step. This is exactly the kind of assistance Claude excels at—don't hesitate to use it!
Step 1: Open Claude and describe your scientific problem in a new chat within a Project
Step 2: Request architecture and file specifications
Step 3: Export specifications as Markdown
Step 4: Open Cursor, create project structure, import specifications
Step 5: Use Cursor to generate initial code with Sonnet 4.5
Step 6: Test locally, debug with Cursor
Step 7: Escalate conceptual issues back to Claude
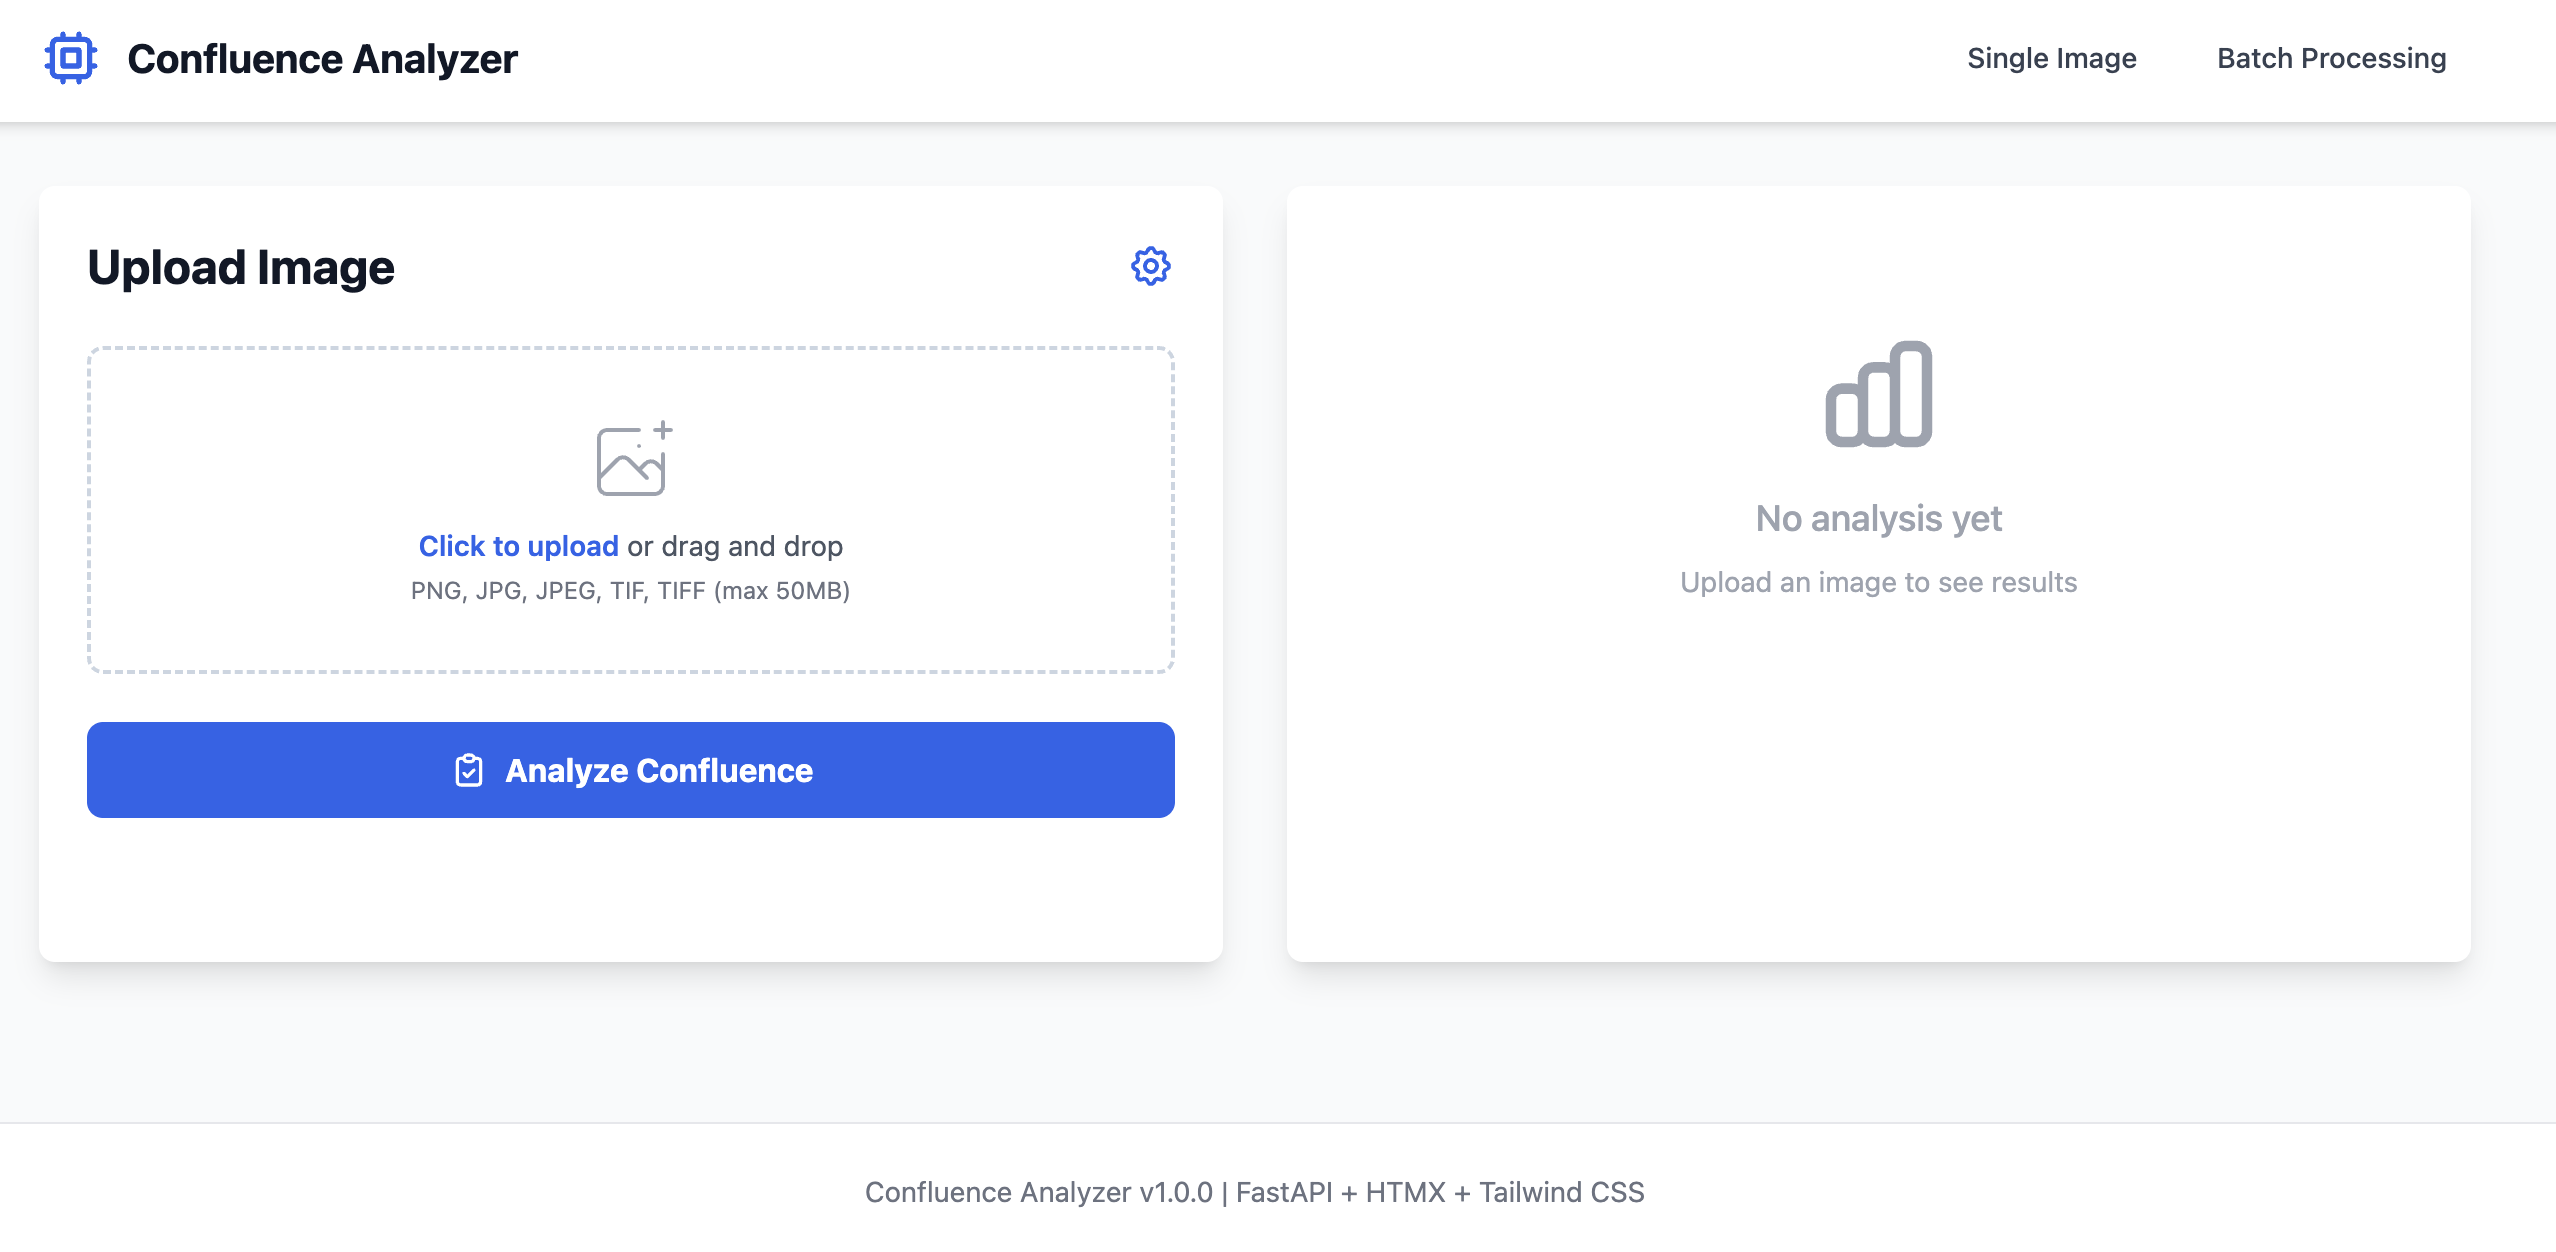
Practice Exercise: Build a Cell Confluence Analyzer
This is a real vibe coding example. The Confluence Analyzer application was built using exactly this workflow. Follow these steps to replicate the process and build your own version.
Expected Time: 2-4 hours for complete implementation | Difficulty: Intermediate | Technologies: FastAPI, HTMX, Tailwind CSS, scikit-image
⚠️ Important: Example Walkthrough Only
This walkthrough demonstrates the vibe coding workflow using a specific example. Do not follow it exactly. Your outputs from Claude and Cursor will differ based on your specific project requirements. The directory structure, file names, and implementation details will vary. Use this as a guide to understand the process, not as a step-by-step recipe to replicate.
Goal: Get Claude to create a structured, detailed prompt for Cursor AI. Claude should output ONLY a single markdown file containing comprehensive specifications, architecture, and requirements—including a regression test suite. Claude generates NO code. This prompt will guide Cursor AI to generate all application code with built-in quality checks.
⛔ Critical: Claude Does NOT Generate Code in Step 1
Claude's role is to create a detailed prompt document for Cursor AI. All code generation happens in Cursor AI (Step 3). If Claude starts generating Python files, HTML, or any code—stop and revise your prompt.
Essential Components of a Good Design Prompt:
1. Clear Objective
What does your app need to do?
- State the core function plainly
- Use domain-specific terminology
- Avoid vague language
2. Scientific Context
Why does this exist?
- Reference established methods
- Link to protocols or papers
- Specify your research domain
3. Request Cursor Prompt
What do you need from Claude?
- Structured md file for Cursor AI
- Technical specifications
- Comprehensive test suite requirements
Step 1 Prompt Template (for Claude.ai):
Create a structured and detailed prompt for Cursor AI to build a [platform] [language] application that implements [core function] for [scientific domain].

Here is the method/protocol to follow:
[URL to reference methodology, paper, or protocol]
[Optional: additional context or requirements]

The prompt should be output as a single markdown file (cursor_prompt.md) that includes:
1. Project overview and objectives
2. Technical architecture and technology stack recommendations
3. Complete directory structure with file specifications
4. Detailed implementation requirements for each component
5. User interface specifications (if applicable)
6. Data processing pipeline details
7. **Comprehensive regression test suite** covering:
   - Unit tests for core functions
   - Integration tests for workflows
   - Edge case handling
   - Error condition validation

The final implementation will use:
- Python 3.12+
- uv for package management
- pytest for testing

Include 2+ test inputs with expected outputs to prevent hardcoding.

Do NOT generate any code or files other than this single markdown prompt file.
Example: Cell Confluence Analyzer Design Prompt
This is what was used to get Claude to create the Cursor AI prompt:
Create a structured and detailed prompt for Cursor AI to build a local Python application that implements Confluence Assessment for cells in life sciences.

Here is the method to follow:
https://www.thermofisher.com/blog/life-in-the-lab/how-to-measure-cell-confluency/

The prompt should be output as a single markdown file (cursor_prompt.md) that includes:
1. Project overview and objectives
2. Technical architecture (FastAPI, HTMX, Tailwind CSS, scikit-image)
3. Complete directory structure with file specifications
4. Detailed implementation requirements for each component
5. User interface specifications with image upload capability
6. Image processing pipeline for confluence calculation
7. **Comprehensive regression test suite** covering:
   - Unit tests for image processing functions
   - Integration tests for API endpoints
   - Edge cases (empty images, invalid formats, extreme confluence values)
   - Error handling validation

The final implementation will use:
- Python 3.12+
- uv for package management
- pytest for testing

Test inputs:
- Cell microscopy image at 10% confluence (expected: 8-12% output)
- Cell microscopy image at 90% confluence (expected: 88-92% output)

Do NOT generate any code or files other than this single markdown prompt file.
Why this worked:
- Single output focus: Only produces cursor_prompt.md, no code, no other files
- Clear objective: "Confluence Assessment for cells"
- Domain specified: "life sciences"
- Reference provided: Thermo Fisher methodology URL
- Comprehensive test requirements: Explicit regression test suite specification
- Test inputs included: 2 examples with expected outputs prevent hardcoding
- Implementation context: Python 3.12+, uv, pytest
⚠️ Common Mistakes to Avoid (Step 1 - Claude Design Prompt)
- Asking Claude to generate code: "Write the Python code..." or "Create main.py..." → WRONG! Step 1 should only produce cursor_prompt.md. All code generation happens in Cursor AI (Step 3)
- Too vague: "Build something to analyze cells" → Missing: what kind of analysis?
- Too prescriptive about tech: "Use FastAPI with HTMX and Tailwind" → Let Claude recommend the stack
- No context: "I need an image analyzer" → Missing: what domain, what methodology?
- No test suite: Forgetting to request comprehensive regression tests → Code errors won't be caught
- Missing test inputs: No example data with expected outputs → Risk of hardcoded solutions
✓ Good Practice Tips (for Step 1 - Claude Design Prompt)
- Remember: Claude generates NO code—only a prompt for Cursor AI
- Start broad, let Claude ask clarifying questions
- Reference URLs to protocols/papers directly in the prompt
- Explicitly state "output as a single markdown file" to avoid code generation
- Request complete directory structure and file specifications in the prompt
- Mention implementation context (Python 3.12+, uv, Cursor) for better recommendations
- Create a Claude Project for this work to manage multiple related chats
Your Task: Write Your Own Prompt
Before moving to Step 2, craft your initial prompt following the template above. Think about your scientific problem, find reference methodology, and be honest about constraints.
Example Input Images (Cell Microscopy)
These are the types of images the Confluence Analyzer application needs to process:

Four microscopy images showing cells at varying confluence levels (approximately 10%, 40%, 60%, and 90% coverage)
Goal: Use Claude's cursor_prompt.md in Cursor AI to generate all application code.
Take the markdown prompt file Claude created in Step 1 and use it to guide Cursor AI's code generation. Cursor AI will handle all implementation details including file structure, dependencies, and testing.
How to Use the Prompt in Cursor AI:
- Open Cursor AI and create a new project directory
- Copy the cursor_prompt.md content from Claude's output
- Paste into Cursor's Composer (Cmd+I or Ctrl+I) or use the Chat interface
- Let Cursor generate the complete application including:
- Directory structure
- All Python files (main application, utilities, tests)
- Configuration files (pyproject.toml, .env templates)
- Test suite (unit tests, integration tests)
- Documentation (README.md)
- Use Cursor's Auto mode for fixes, refinements, and debugging
Example Workflow in Cursor AI:
Step 2a: Initial Generation
Open Cursor Composer (Cmd+I), paste the entire cursor_prompt.md content, and let Cursor generate the initial codebase. This typically takes 2-5 minutes with Sonnet 4.5.
Step 2b: Run Initial Tests
Execute the test suite Cursor generated:
uv run pytestReview any test failures and use Cursor's Auto mode to fix issues.
Step 2c: Iterate and Refine
Use Cursor's Auto mode or Chat to fix bugs, add features, or adjust implementation details. The comprehensive test suite from Step 1 helps catch regressions.
✓ Why This Workflow Works:
- Claude focuses on strategy: Creates comprehensive specifications without getting bogged down in code
- Cursor focuses on implementation: Generates all code based on Claude's detailed requirements
- Test suite catches errors: Regression tests from Step 1 validate Cursor's code generation
- Single source of truth: The cursor_prompt.md file contains everything Cursor needs
- Iterative refinement: Use Cursor's Auto mode to fix bugs found by tests
Cursor AI Generated Complete Application:
📁 Project Structure
confluence-assessment/
├── src/
│ ├── main.py
│ ├── config.py
│ ├── image_processing.py
│ ├── batch_processor.py
│ └── models.py
├── templates/
│ ├── index.html
│ ├── results.html
│ └── batch.html
├── uploads/
├── outputs/
├── pyproject.toml
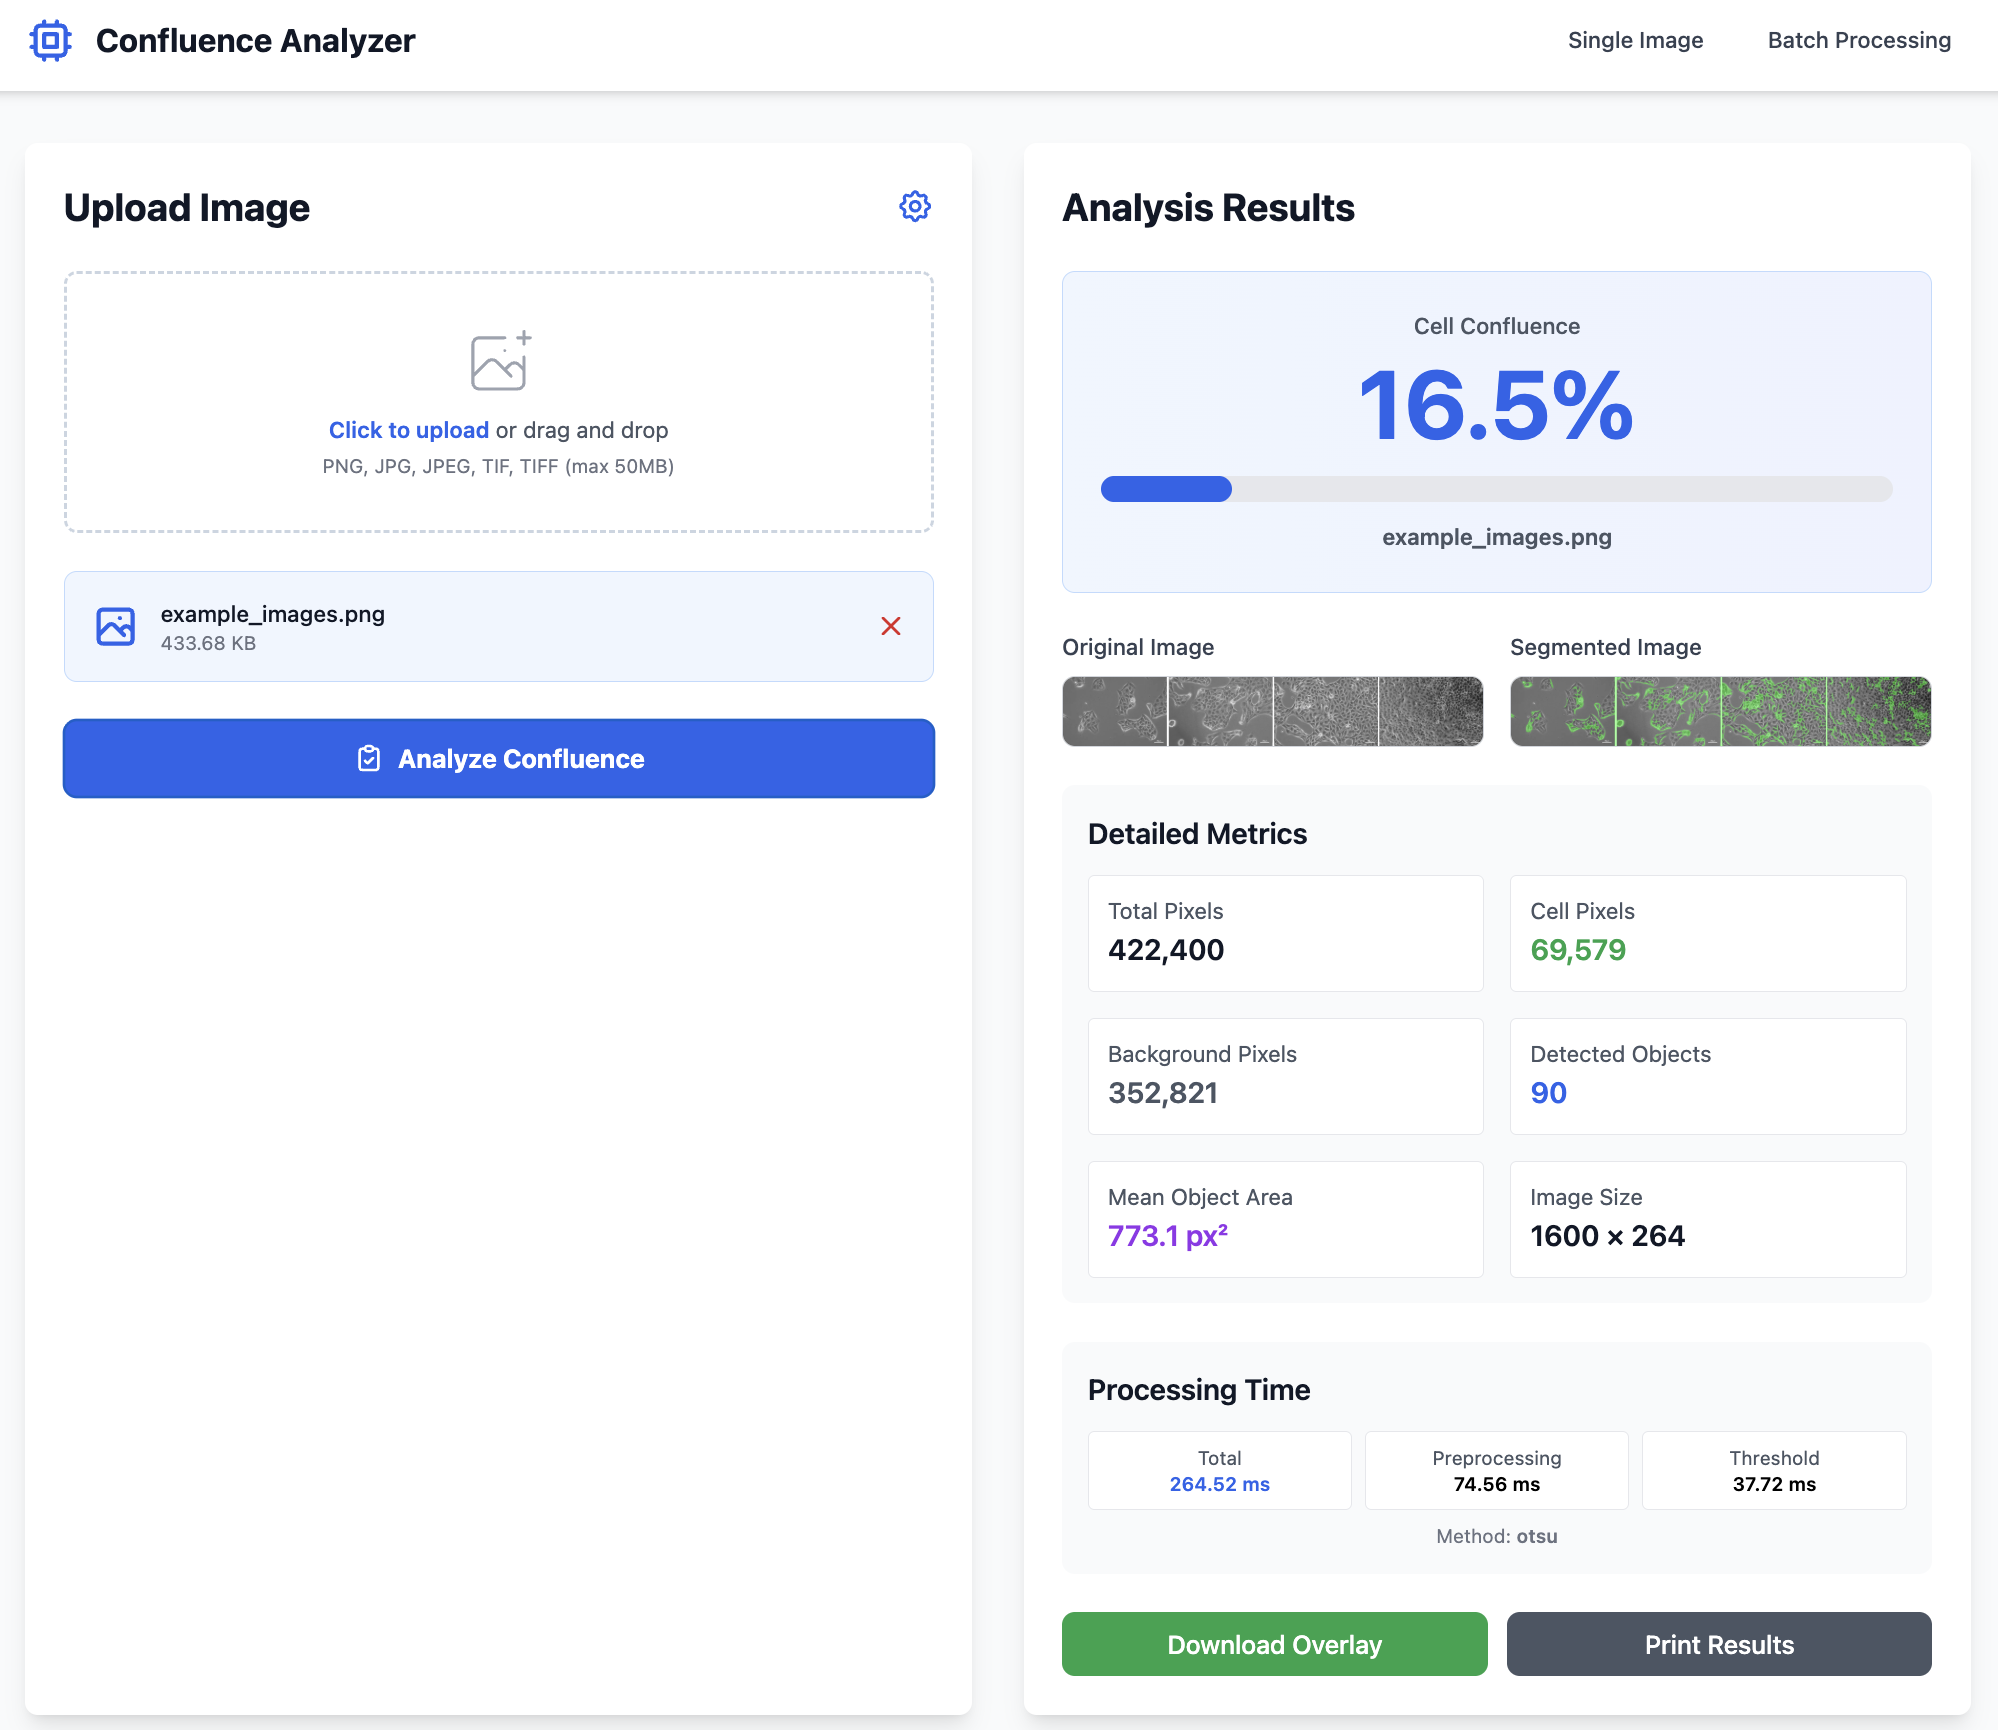
└── uv.lock📊 Performance Achieved
- ⚡ ~130ms processing time
- 🎯 85-95% accuracy vs manual
- 📦 FastAPI + HTMX + Tailwind
- ✅ Batch processing capable
Application Screenshots
✓ README.md Generated Automatically
Cursor also generated comprehensive documentation including installation steps, usage instructions, API endpoints, and troubleshooting guides. This wasn't requested—it followed best practices automatically.
🤖 In Claude
- Create a new Project for this work
- Use the Step 1 prompt template to request cursor_prompt.md
- Verify Claude outputs ONLY the markdown file (no code)
- Copy the cursor_prompt.md content
- Ask Claude to refine specifications if needed
⌨️ In Cursor AI
- Create project directory
- Open Cursor Composer (Cmd+I) and paste cursor_prompt.md content
- Let Cursor generate complete application (Cursor creates .venv automatically)
- Run tests:
uv run pytest - Debug and iterate with Cursor's Auto mode
Expected total development time: 2-4 hours from prompt to working application
Security Considerations
From a security perspective, there is a key consideration for users of the "Free" versions of Cursor and Claude. Free tiers usually have data-sharing turned on by default, which is a bit of a red flag. To help the team stay safe, tweak these configurations:
Claude (In-Browser)
Navigate to Settings > Account and toggle off "Allow Anthropic to use my data to improve our products."
Note: Disabling this prevents your conversations from being used in model training, keeping your scientific data and proprietary information private.
Cursor
Go to Settings > General and enable "Privacy Mode." This ensures code remains local/encrypted and isn't used for model training.
Note: Privacy Mode protects your codebase and project files from being transmitted to Cursor's servers for training purposes.
Encourage users to create a dedicated project folder for their work rather than opening their entire "Documents" or "Home" directory. This keeps Cursor's access limited to just the files they are actually working on.
Best Practice: Create project-specific folders like /Projects/experiment-analyzer rather than opening ~/Documents or ~/Home
✓ Peace of Mind
This will give your organization peace of mind, while you build prototypes!
Building ML Systems: The Two-Tool Approach
This guide extends vibe coding to machine learning and drug discovery workflows. The core principle: separate strategic thinking from implementation using Claude Sonnet 4.5 for reasoning and Cursor AI for building.
🧠 Tool 1: The Scientist (Claude Sonnet 4.5)
Purpose: High-level reasoning and scientific strategy
"Design a feature engineering strategy for small molecule binding affinity."
Why Claude?
- Better at "holding the whole problem in its head"
- Spots subtle scientific flaws (data leakage, biological violations)
- Provides nuanced analysis of algorithm implications
Output: Text specification or detailed blueprint
⚙️ Tool 2: The Builder (Cursor AI)
Purpose: Implementation and code generation
"Here is the spec for the feature engineering class. Write the PyTorch implementation."
Why Cursor AI?
- Superior at coding mechanics (imports, syntax, refactoring)
- Better file management and multi-file edits
- Fewer syntax errors, better edge case handling
Output: Production-ready code
💡 Using Both Tools Effectively
Recommended workflow: Use Claude for strategic thinking and architecture (create specifications, analyze approaches, review designs), then move those specifications to Cursor AI for implementation. This two-tool approach keeps strategic reasoning separate from code generation, reducing context switching while maintaining clear separation of concerns. Export Claude's specifications as markdown files and reference them when prompting Cursor AI.
Scenario: You need to build a new graph neural network (GNN) layer for molecular property prediction.
Step 1: The "Deep Think" (Claude Sonnet 4.5)
Time: 5-10 minutes
I am designing a GNN for drug discovery. I need to engineer edge features
based on bond type and stereochemistry. Review standard literature (like RDKit
conventions) and propose a robust JSON schema for these features. Warn me about
potential edge cases with disconnected graphs.
What to expect: Detailed analytical plan, JSON/text specification, edge case warnings, literature references
Action: Copy the summary and key specifications into a text file
Step 2: The "Spec Transfer" (You)
Create a new file in Cursor (e.g., specs/edge_features_spec.md)
Why this matters: You are feeding the "smart" reasoning into the "fast" coder. This grounds Cursor and prevents naive implementation mistakes.
# Edge Features Specification

## Feature Schema
[JSON or structured description]

## Constraints
- No null values in bond types
- Must handle disconnected atoms
- Stereochemistry: must preserve 3D orientation

## Edge Cases
- Aromatic bonds: treat as hybrid sp2
- Implicit hydrogens: RDKit convention
Step 3: The "Build" (Cursor AI)
Tool: Cursor Composer (Cmd+I / Ctrl+I) | Time: 5-15 minutes
Model verification: Go to Cursor Settings → Models → Confirm "Claude 3.5 Sonnet" (NOT cursor-small)
Read `specs/edge_features_spec.md`. Create a new file `features/bond_processing.py`.
Implement the `BondFeaturizer` class described in the spec. Use `rdkit` and
`torch_geometric`. Ensure strict typing.
Expected: 90%+ correct first attempt (following high-quality blueprint)
Step 4: Review & Refine (Cursor Chat)
Tool: Cursor Chat (Cmd+K / Ctrl+K) | Time: 5-10 minutes (iterative)
Run the generated code, highlight problematic blocks, ask for specific fixes:
- "This loop looks slow for large molecules. Vectorize it using RDKit operations."
- "Add handling for molecules with 100+ atoms—current implementation times out."
- "The current approach loses stereochemistry. Integrate CIP rules for priorities."
Each refinement cycle: 2-3 prompts until convergence
Step 5: Integration (Cursor Chat)
Time: 5 minutes
Integrate the BondFeaturizer into `data/molecule_loader.py`.
Update the `__getitem__` method to use the new edge features.
Also update `config/train_config.yaml` with new feature dimensions.
| Task | Best Tool/Model | Why? |
|---|---|---|
| Scientific Strategy | Claude (Sonnet 4.5) | Deepest reasoning; catches scientific logic errors |
| System Architecture | Claude (Sonnet 4.5) | Better at "big picture" component design |
| Writing Code | Cursor AI (Sonnet 4.5) | Faster, fewer syntax errors, better file management |
| Refactoring | Cursor AI (Sonnet 4.5) | Composer feature unmatched for multi-file edits |
| Quick Fixes | Cursor AI (Sonnet 4.5) | Instant context awareness of your repo |
| Algorithm Debugging | Cursor AI Chat (Sonnet 4.5) | Understands your entire codebase |
| New Module Design | Claude (Sonnet 4.5) | Handles abstract design better |
1. Separate Strategy from Execution
Claude = "What and Why" | Cursor AI = "How and When"
2. Use Specs as Bridges
Write down Claude's reasoning before asking Cursor AI to code. Reduces iteration cycles by 50%+
3. Cursor Composer is Your Multiplier
Use Cmd+I to edit multiple files at once. Perfect for features that span multiple modules
4. Always Review Output
Sonnet is "too agreeable"—check for data leakage, silent column drops, assumption mismatches
5. Iterate Rapidly
Each cycle takes 5-10 minutes. 4 cycles = polished, production-ready module
For a typical ML feature engineering module (300-500 lines):
Deploying webapps to Vercel
Vercel offers zero-configuration deployment for static sites and serverless functions. It's ideal for getting vibe-coded prototypes online quickly. This guide focuses on practical deployment, not production engineering—these are demos and prototypes, not enterprise applications.
✓ Static HTML/CSS/JS sites
Single-page apps, documentation, visualizations, interactive demos
✓ Serverless Python/Node APIs
Simple REST endpoints, data processing, file conversions (max 10s execution)
✓ Prototype sharing
Get a live URL in minutes to share with collaborators or supervisors
✓ Free tier generous
100GB bandwidth, unlimited deployments, automatic HTTPS, custom domains
✗ Long-running computations
Serverless functions timeout at 10s (hobby) or 60s (pro). No overnight model training.
✗ Large file storage
Blob storage free tier: 1GB total. Not for datasets, images, or user uploads at scale.
✗ Stateful applications
Every request gets a fresh container. No persistent in-memory state.
✗ Heavy Python dependencies
250MB uncompressed limit (50MB compressed). PyTorch, TensorFlow, full scipy stacks often exceed this with all dependencies.
Vercel Blob is an S3-compatible object storage for files. It's useful for storing user uploads, generated images, or processed data files.
Free Tier Limits
- 1GB total storage
- 1,000 read requests per month
- 1,000 write requests per month
- 1GB bandwidth per month
Basic Usage (Python):
from vercel_blob import put, get, list_blobs

# Upload file
blob = await put('data.csv', file_content, token=BLOB_TOKEN)
# Returns: {'url': 'https://...', 'pathname': 'data.csv'}

# Download file
data = await get('data.csv', token=BLOB_TOKEN)

# List all files
files = await list_blobs(token=BLOB_TOKEN)
Reality: For scientific prototypes, 1GB is enough for demo purposes but not for production datasets. Use external storage (S3, Dropbox, Google Drive) for larger files.
Important limitation: The Confluence Analyzer uses FastAPI with image processing (scikit-image, NumPy). While individual libraries might seem manageable, their transitive dependencies (scipy, joblib, etc.) can push the total beyond Vercel's 250MB uncompressed serverless limit. This walkthrough demonstrates the process, but you'd likely need to either: (a) significantly simplify dependencies, (b) use Vercel Edge Functions with WebAssembly, or (c) deploy the full app elsewhere (Railway, Render, Fly.io).
Modified Deployment: Static HTML Frontend Only
For demonstration, we'll deploy a simplified version: just the static HTML interface without the Python backend. Users can upload images, but analysis would require a separate backend deployment.
Step 1: Prepare Your Project
Create a simple project structure:
confluence-demo/
├── index.html          # Your main HTML file
├── assets/
│   ├── logo.png       # Any images
│   └── styles.css     # Optional CSS
└── vercel.json        # Optional config
Step 2: Create Vercel Account
- Go to vercel.com
- Sign up with GitHub (recommended) or email
- Connect your GitHub account for automatic deployments
Step 3: Initialize Git Repository
cd confluence-demo
git init
git add .
git commit -m "Initial commit"

# Create GitHub repo and push
git remote add origin https://github.com/yourusername/confluence-demo.git
git push -u origin main
Step 4: Deploy to Vercel
Option A: Via Vercel Dashboard (Easiest)
- Go to vercel.com dashboard
- Click "Add New Project"
- Import your GitHub repository
- Vercel auto-detects it's a static site
- Click "Deploy"
- Wait 30-60 seconds
- Get live URL:
https://confluence-demo.vercel.app
Option B: Via Vercel CLI
# Install Vercel CLI
npm install -g vercel

# Login
vercel login

# Deploy (from project directory)
vercel

# Follow prompts:
# - Link to existing project? No
# - Project name? confluence-demo
# - Directory to deploy? ./
# - Auto-detected settings okay? Yes

# Deploy to production
vercel --prod
Step 5: Configure Custom Domain (Optional)
- Go to Project Settings → Domains
- Add your domain (e.g., confluence.yourdomain.com)
- Update DNS records as instructed by Vercel
- Vercel automatically provisions SSL certificate
Step 6: Automatic Deployments
Every push to your GitHub main branch triggers automatic deployment:
# Make changes
echo "Updated content" >> index.html

# Commit and push
git add .
git commit -m "Update content"
git push

# Vercel automatically deploys within 30-60 seconds
# Preview URL: https://confluence-demo-git-main.vercel.app
# Production URL: https://confluence-demo.vercel.app
For FastAPI apps like the Confluence Analyzer, you'll need to adapt for serverless constraints:
Project Structure for Serverless
api/
├── index.py           # Main FastAPI app
└── pyproject.toml     # Python dependencies

public/
└── index.html         # Static frontend

vercel.json            # Deployment config
vercel.json Configuration
{
  "builds": [
    {
      "src": "api/index.py",
      "use": "@vercel/python"
    }
  ],
  "routes": [
    {
      "src": "/api/(.*)",
      "dest": "api/index.py"
    }
  ]
}
Reality check: The Confluence Analyzer requires scikit-image (~40MB) + NumPy (~15MB) + Pillow (~3MB) = ~58MB for the core libraries, which fits within the 250MB uncompressed limit. However, scikit-image pulls in scipy (~100MB), joblib, and other transitive dependencies that can push the total deployment size to 200MB+.
💡 Use Claude & Cursor AI to Optimize Package Size
If your deployment approaches the 250MB limit, use the two-brain approach to optimize:
Step 1: Ask Claude for Strategy
Prompt example:
"My FastAPI app with scikit-image is ~200MB uncompressed. I need to deploy to Vercel (250MB limit). Analyze my pyproject.toml and suggest: (1) lighter alternatives for image processing, (2) dependencies I can remove, (3) architecture changes to reduce bundle size."
Claude will identify heavy dependencies, suggest alternatives (e.g., PIL instead of scikit-image for basic operations), and propose architectural changes.
Step 2: Implement with Cursor AI
Take Claude's recommendations to Cursor:
"Refactor the image processing module to use Pillow instead of scikit-image. Replace the gaussian_filter function with PIL's ImageFilter.GaussianBlur. Update pyproject.toml and all affected functions."
Cursor will handle the refactoring, update imports, and modify your pyproject.toml file.
Step 3: Verify Size Reduction
After optimization, check your deployment size locally:
# Export dependencies for deployment
uv export --no-hashes > requirements.txt
pip install -r requirements.txt --target ./package
du -sh ./package
# Compare before and after
This iterative approach often reduces deployment size by 40-60% while maintaining functionality.
For ML/scientific apps: Modal Labs (modal.com) is particularly well-suited for applications requiring compute resources. No size limits on dependencies, built-in GPU support, and often more cost-effective than traditional hosting.
Why Modal for Scientific Apps
- No dependency size limits—PyTorch, TensorFlow, scikit-image all work fine
- On-demand compute: Pay only for actual function execution time
- Built-in GPU support for ML inference or training
- Automatic scaling from zero to thousands of concurrent requests
- Container-based: Full control over environment and dependencies
Basic Modal Setup
# Install Modal
uv add modal

# Login
modal token new

# Create app.py
import modal

app = modal.App("confluence-analyzer")

@app.function(
    image=modal.Image.debian_slim()
        .pip_install("scikit-image", "numpy", "pillow", "fastapi"),  # Modal's API for container dependencies
    gpu="T4"  # Optional: Add GPU if needed
)
@modal.web_endpoint()
def analyze_confluence(request):
    # Your analysis code here
    return {"confluence": 0.85}

# Deploy
modal deploy app.py
Cost Comparison
Modal charges per compute-second. For scientific apps with intermittent usage (demos, research tools), this is often cheaper than always-on hosting:
- Free tier: $30/month credits
- CPU: ~$0.0001 per second
- GPU (T4): ~$0.0005 per second
- No charges when not in use
Recommendation: Use Vercel for static frontends and simple APIs. Use Modal for anything requiring ML libraries, GPUs, or compute-intensive processing. They complement each other well.
Variables and Types
# Variables (dynamic typing)
name = "experiment_01"
temperature = 37.5
is_valid = True
samples = [1, 2, 3, 4, 5]

# Type checking
type(temperature)  # <class 'float'>
Control Flow
# If statements
if temperature > 35:
    print("High temperature")
elif temperature > 25:
    print("Normal temperature")
else:
    print("Low temperature")

# For loops
for sample in samples:
    print(f"Processing sample {sample}")

# While loops
count = 0
while count < 5:
    count += 1
Functions
# Basic function
def calculate_average(values):
    return sum(values) / len(values)

# With type hints
def process_data(data: list[float]) -> float:
    """Process data and return average."""
    return sum(data) / len(data)

# Lambda functions
square = lambda x: x ** 2
Lists
# Creating and manipulating lists
samples = [1, 2, 3, 4, 5]
samples.append(6)
samples.extend([7, 8])
first = samples[0]
last = samples[-1]
subset = samples[1:4]  # Slicing

# List comprehension
squared = [x**2 for x in samples]
filtered = [x for x in samples if x > 3]
Dictionaries
# Creating and using dictionaries
experiment = {
    "name": "test_01",
    "temperature": 37.5,
    "duration": 120
}

# Accessing values
temp = experiment["temperature"]
temp = experiment.get("temperature", 25)  # With default

# Iterating
for key, value in experiment.items():
    print(f"{key}: {value}")
NumPy Arrays
import numpy as np

# Creating arrays
arr = np.array([1, 2, 3, 4, 5])
zeros = np.zeros((3, 3))
ones = np.ones((2, 4))
random = np.random.rand(5)

# Operations
mean = arr.mean()
std = arr.std()
normalized = (arr - arr.mean()) / arr.std()Reading Files
# Text files
with open('data.txt', 'r') as f:
    content = f.read()
    lines = f.readlines()

# CSV files with pandas
import pandas as pd
df = pd.read_csv('data.csv')

# JSON files
import json
with open('config.json', 'r') as f:
    config = json.load(f)
Writing Files
# Text files
with open('output.txt', 'w') as f:
    f.write('Results\n')
    f.writelines(['line1\n', 'line2\n'])

# CSV with pandas
df.to_csv('output.csv', index=False)

# JSON
data = {"experiment": "test_01", "result": 42}
with open('results.json', 'w') as f:
    json.dump(data, f, indent=2)
Path Handling
from pathlib import Path

# Modern path handling
data_dir = Path('data')
file_path = data_dir / 'experiment.csv'

# Check existence
if file_path.exists():
    print("File found")

# Create directories
output_dir = Path('output')
output_dir.mkdir(exist_ok=True)Environment Setup (Cursor handles automatically)
# Cursor creates .venv automatically when you start coding
# No manual creation needed

# If you want to create manually:
uv venv

# Run Python (uv auto-detects .venv)
uv run python script.py

# Run commands in environment
uv run pytest
uv run python -m module_namePackage Management (Cursor handles automatically)
# Cursor runs these commands automatically:
# uv add numpy  (when you import numpy)
# uv add pandas (when you import pandas)

# Manual package management (if needed):
uv add numpy              # Add package
uv add numpy==1.24.0      # Specific version
uv add --dev pytest       # Dev dependency
uv sync                   # Install from pyproject.toml
uv tree # View dependency treeuv add automatically. Manual commands only needed for edge cases. Learn more: uv-intro.vercel.appEnvironment Variables
# .env file
API_KEY=your_api_key_here
DATABASE_URL=postgresql://localhost/db

# Loading in Python
from dotenv import load_dotenv
import os

load_dotenv()
api_key = os.getenv('API_KEY')Project Structure
project/
├── .venv/             # Virtual environment (created by uv)
├── src/               # Source code
│   ├── __init__.py
│   ├── main.py
│   └── utils.py
├── tests/             # Test files
│   └── test_main.py
├── data/              # Data files
├── .env               # Environment variables
├── .gitignore
├── pyproject.toml     # Dependencies (managed by uv)
├── uv.lock            # Lock file (auto-generated)
└── README.md